Okay, this is the most common thing I get asked..."how in the h**l do you take images like that?"
Let's just say that I've been in to this for years, and have read/studied and learnt many tricks from some truly great people along the way. I can recommend some cracking books like Ron Wodaski's "
New CCD Astronomy" which was like a mini bible for this topic, and Steve Richards excellent "
Making every Photon Count" which I reviewed for UK magazine Astronomy Now when working as their equipment consultant.
So... from the start to the end, in a simplified manner, here goes
1:
Check the skies... if the night is nice and clear, lots of stars, no or v little Moon light, and little or no clouds, it's time to get the equipment pointing up. I am lucky to have an observatory which was built by a local firm based in Marlborough, Wiltshire. It's a run off roof 8ft x 6ft shed, with CCD security/alarms and a direct underground link to the house, which means I now (as is the case with 99% of professional observatories) do all my work from indoors operating it remotely. In the observatory are
netbook sized laptops which connect to the telescope mount and cameras, they are ethernet linked to the house via a powerline ethernet link, and that's about the size of that
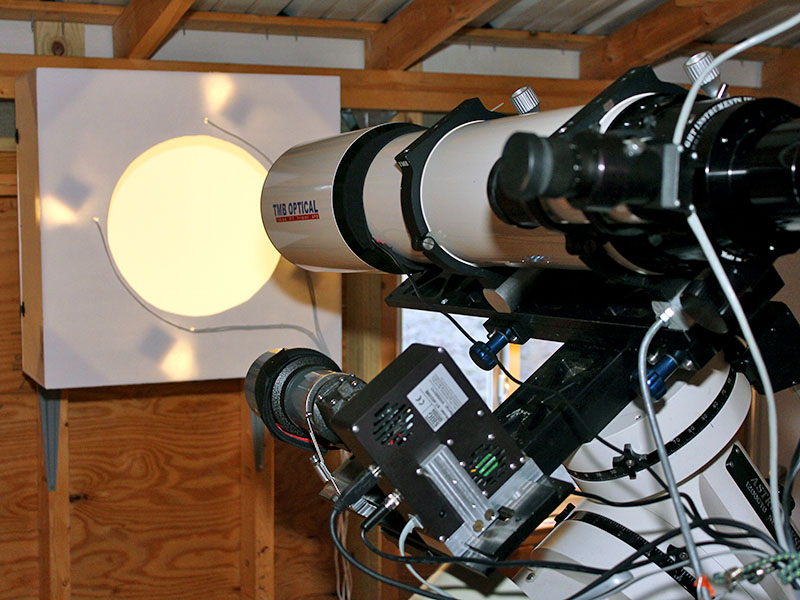
2; Equipment. 80% of my night time imaging is done on a 4" refracting telescope, not a monster big Hubble like thing, a small, but very good optically
TMB105 telescope. It is connected to a
focal reducer, which gives it an F4.9 focal ratio (wider field and faster for imaging faint objects), which is then connected to a cooled
Atik 4000 camera, usually running at around -35 degrees (the cooling keeps the amount of noise in the camera down to almost zero). Noise is a key factor in astro imaging, and most DSLR's cope well with it these days, but the professional cooled CCD still beats pretty much all. Dual stage cooling, as in the Atik (triple in the 4000 with a water cooling option) really does kill almost all the noise.
That sits alongside a skywatcher ST102 (102mm) refracting telescope which has a Meade DSI-C CCD camera on it, which in turn acts as a
guide camera. I use that as it's very sensitive compared to many of the other CMOS type guide cameras, and up to now has never ever failed to find a guide star with a 1s exposure.
A
guide camera is critical for deep sky imaging, as it basically locks on to a star in the field of view where you're imaging, and sends minute corrections to the telescope mount (which, unless you spend about £10K on a mount, will need it) to ensure that the scope locks on to your target. Both scopes have dew heaters wrapped around the top near to the main lens to get rid of any dew (
Kendrik dew heater with 4 channels, the other two work on the other scopes/cameras). I use a GPUSB guide port interface, which connects to my
EQ6 telescope mount, and then via USB to the computer. The cameras also connect via USB to the computer. So in effect, you need a laptop with at least 3-4 USB ports or a USB hub, ideally an active one to get it all connected. (in this scenario)
3: So... first things first... Boot up the PC, and then I launch an application called
PHD Guide. This is free and brilliant guide camera software written by Craig Stark. I select the
Meade DSI and the
GPUSB and then select 1-2 seconds exposure time..the camera, which at this point is pointing towards polaris (which is the telescope's "home" position) shows me stars. Next step, I boot up the Atik capture software, which comes free with the Atik cameras.
I set this up to start cooling down the camera (takes about 3 minutes on average) and again cycle to expose on the stars near polaris. I check the filter wheel (Atik EFW which is also connected via USB as it's motorized), and check the focus position on the filters I will be using (they are all parfocal Astronomik filters, but I always check them each night) The filters I typically use are CLS (light pollution, though it's not bad near me at all), H-Alpha, OIII, SII and HBeta. These are almost all narrowband filters, which work really well on nebula and comets (OIII on comets is v good)The SII/HA/OIII combination of filters when mapped to RGB colours is commonly referred to as "The Hubble" palette as it was used famously on the 1995 image of the "Pillars of Creation"
4: Then comes the magic bit...using another bit of free software called
EQMOD, and EQASCOM control, I launch a free planetarium application called
Cartes Du Ciel. In this I have various star catalogues loaded (also free). The software then gives me the option to "connect to telescope" which I do, and this fires the EQ6 in to life. The planetarium software now shows me that the telescope is pointing at Polaris. I then, after checking with websites like
calsky.com and various star maps I have, will pick a target (maybe a new comet, maybe a galaxy, may be a nebula)..I tend to image nebula in narrowband only when the Moon is up, and galaxies using the
CLS filter and NB filters when not. I then click on the target and select "slew to target" on the software. The scope then moves to and locks on to the object I wish to image, with frightening accuracy...seriously, dead centre 99% of the time.. EQMod is free and it basically allows you to "map" alignment points of stars, which I do every few months or so (to refresh it), this is how it is so accurate.. great and free software!
5: Okay, so scope and cameras are now ready, cameras are cooled down, scope pointing at target. Go back in to Atik capture software, and set the binning (making the pixels work together) to 6x6 I select a 3 second ish exposure to verify that the object is in the right position (accuracy is one thing, aesthetic/framing is another!). I may then move the scope a bit, again using the software controls to nudge it.. when happy with positioning, I set up the Atik sequencer control to select the exposure times (anywhere from 30s to 40 minutes...yes, I have done 40 minute single exposures before!!) and leave that..
6: Then, back in to PHD guide software, and exposure time at 1-2 seconds, get a
suitable guide star. Click on the PHD button, wait about 1 minute whilst it calibrates the mount, works out which way is which, and after a minute says "guiding", the star locked in cross hairs. I turn on the guide graph to verify how accurate the guides are
7: Now with the guide lock on, I go back to the Atik software, set the binning to 1x1 or 2x2 (both good enough resolution to get nice images) and select a star. Binning is when adjacent pixels on the CCD combine. It reduces the time needed to take the image, but also reduces the resolution, so works best I find on higher resolution cameras. I will fractionally tweak the focus until the star's FWHM (focus assist) reads a value close to or <1 (usually on a good night below around 1.5, but on an exceptional night <1), this means the stars are really tightly in focus. You can use various masks on the front of the scope, I just prefer the FWHM method, it works for me..
8: Focus on, all looking good... set a test exposure up of say 60s, check it all looks nice at that time, then run the sequencer... leave to stew for however many hours that takes...go inside for
cuppa !
9: Now, totally from indoors (it's warm!), remote desktop link in to laptops in observatory using Windows RDP or some VNC client (if using iphone/android phone which I sometimes do) set sound on, (as PHD guide will beep an alarm if it loses a guide star, which usually means a cloud or something got in the way, and that will cack up the image too)
10: When the image sequence run is done, I usually have about 30-60 individual images, around 10-20 for each of the usually 3 filters I will use (depending on the object).. these are all in
FITS format
11: Now, load up
Maxim DL (expensive software, but superb, really is the best out there).. load up the images in to that, and calibrate them.. This means noise reduction. Prior to imaging, about once a month (usually on a cloudy night) I will create a set of
flat field frames (which are basically a white image created by covering the front of the scope in a white t-shirt and shining a diffuse lamp on it) . These show up any dust or other munge on the CCD/filters etc... I also do dark frames (cover the telescope with it's cover/cap and expose the camera for as long as your actual exposure times, so I have darks for 240s, 360s, 600s and 2400s stored). These record just the camera noise at the temperature I run it at.. usually not much, but then using the calibration option in Maxim DL, it removes all trace of dust and noise in all the images I have taken..
12: Next step, stack the images. Using Maxim DL's stacking option, I will then load up all the images into groups (usually called HA/OIII/SII etc) and set the minimum threshold of acceptability in each image (Maxim has an option for this for roundness etc).. Then hit the stack button and get three images which are the sum of all the images taken (I use SD mode in Maxim to sum the images, removing any cosmis ray strikes etc)
13: Now, we have three master images. Save them in FITS format
15: Next I usually run Maxim DL's
DDP processing option. This kind of makes the overall image levels better, so, brighter cores in galaxies sit better with the outer arms...that kind of thing. This is well documented online.
15: Next step, I use a process known as
deconvolution to tighten up everything more.. the fat tail deconvolution plug in (free) for Maxim DL works well, takes a minute or two to work, but works nicely and you get really tight stars
16: Finally, take the images and load them in to
Photoshop (I use CS5, but GIMP or earlier versions will work). I use
Noel's actions (google it!) for photoshop to clean up and tweak the images a bit more (usually noise reduction and light pollution removal). Then create a final image by combining the three images as Red, Green and Blue channels. Adjust levels and curves to taste, sometimes use the excellent "
Focus Magic" to tighten the focus up a bit more..
And that's it! It's how I roll, but there are a billion different ways around this. The books I have suggested are excellent starters, and also forums like
UKAstroImaging and
Stargazers Lounge have tons of people doing this all the time, with different equipment, cameras etc...


